Start Here Track
Step 5 of 5
The Three Starting Points: How I Decide Where to Begin
Three Doors, Same Building
In the last tutorial, I showed you the big picture — three starting points, a flexible middle, one finish. Now let's get into the starting points themselves.
Every image I make enters the pipeline through one of three doors. The door I choose depends on what I'm working with and what I want out of it.
This isn't a step-by-step guide. These are three separate approaches. You pick one. Which one depends on your source material and your goal.
Starting from a Reference Image
This is my most common starting point. I find an image I like — could be a photo, a screenshot, fan art, a painting, anything — and I use it as the visual foundation.
But I don't just throw the raw image into img2img. There's a step before that.
The Crop
First, I crop the reference image to the exact aspect ratio I want the final output to be. I use a custom cropping tool that locks the aspect ratio so every image comes out at a consistent size. I pick the part of the image I want to base the generation on — maybe it's the face and upper body, maybe it's the full pose, maybe it's just a background composition I liked.
This matters more than people think. The crop determines what the AI focuses on. A tight crop of a face produces a completely different result than a full-body crop of the same image.

Here I'm cropping the upper body from a character sheet. The cyan box is locked to my target aspect ratio — 13:19 portrait. That crop is what goes into the next step. Everything outside the box is gone.
The Tags
After cropping, I run the image through a tagger — an AI model that looks at the image and extracts tags describing everything it sees. Pose, clothing, lighting, colors, expression, background, style.
Here's where it gets interesting: I have multiple taggers and I pick different ones depending on what I want.
- If I want a faithful interpretation of the reference, I use a tagger that pulls out a lot of detail — every element of the clothing, the exact lighting setup, the specific pose description.
- If I want loose variations, I use a tagger that gives me broader, less specific tags. This gives the AI more room to interpret and creates more variety.
- If I'm working with a realistic photo, I go heavy on the details. Real photos have a lot of nuance — skin texture, fabric type, specific lighting angles — and I want to capture all of that.
- If it's anime or a painting, I go lighter. These images have less detail to extract, and over-tagging them just adds noise.
The tagger choice is one of the biggest decisions in the whole pipeline. Same image, different tagger, completely different output.
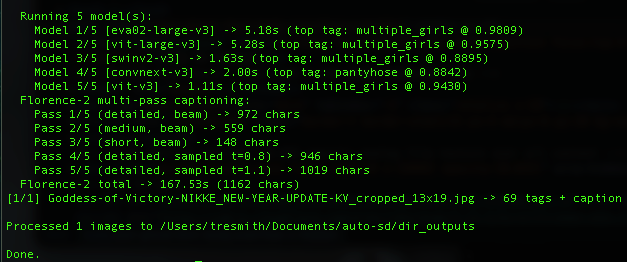
Here's what it looks like when I run my tagger on a cropped reference. Five different classification models analyze the image, then Florence-2 generates detailed captions in multiple passes. The result: dozens of tags plus a full description. All of that becomes the raw material for the prompt.
The Enhancement Pass
Raw tagger output is a starting point, not a finished prompt. The tags are accurate but flat — they describe what's in the image without any atmosphere, style, or mood.
Before I generate anything, I run the tags through an enhancement pass. I have a library of prompt upgrade techniques — each one rewrites the prompt to improve a specific quality. Cinematic lighting. Dynamic composition. Material textures. Color palette. Atmosphere.
I pick whichever ones fit the image I'm going for and run them in sequence. The order matters — I usually go lighting first, then composition, then trim any duplicate or redundant tags that crept in.
Here's a real example. This is the raw tagger output from a cropped anime character:
"...a young woman with long, wavy blonde hair and large, expressive brown eyes... standing with her arms at her sides, looking directly at the viewer with a smile... the background is a simple light blue color... 1girl, long_hair, solo, blonde_hair, breasts, smile, looking_at_viewer, cleavage, detached_sleeves, bare_shoulders..."
And here's what it looks like after the enhancement pass:
"...(1girl) in early twenties, standing with hand on hip, looking at viewer with radiant expression. (very long wavy champagne blonde hair) with burnt sienna backlight creating luminous halo effect. (large expressive slate grey eyes) with warm lens flare bloom. Ilya Kuvshinov digital painting style with soft cel-shading... dramatic copper rim lighting on silhouette, volumetric dusty periwinkle light shafts through atmospheric haze..."
Same image. Same tags. But the enhanced version has specific color names instead of generic ones ("champagne blonde" instead of "blonde"), atmospheric lighting instead of nothing, an art style reference, and parentheses weighting on the elements that matter most.
Same concept. Completely different image.
I break down the full enhancement toolkit in a paid tutorial for members — but the takeaway here is that there's a step between tagging and generating that most people skip entirely. The tagger gives you the skeleton. The enhancement pass gives it a soul.
What Happens Next
The enhanced tags go into my txt2img pipeline to generate variations. Or the cropped reference goes directly into img2img. Or both — I might do txt2img variations first, then pick the best ones and run those through img2img.
This is what I meant by "the middle is a toolbox." After the start, there are multiple paths forward.
The Results
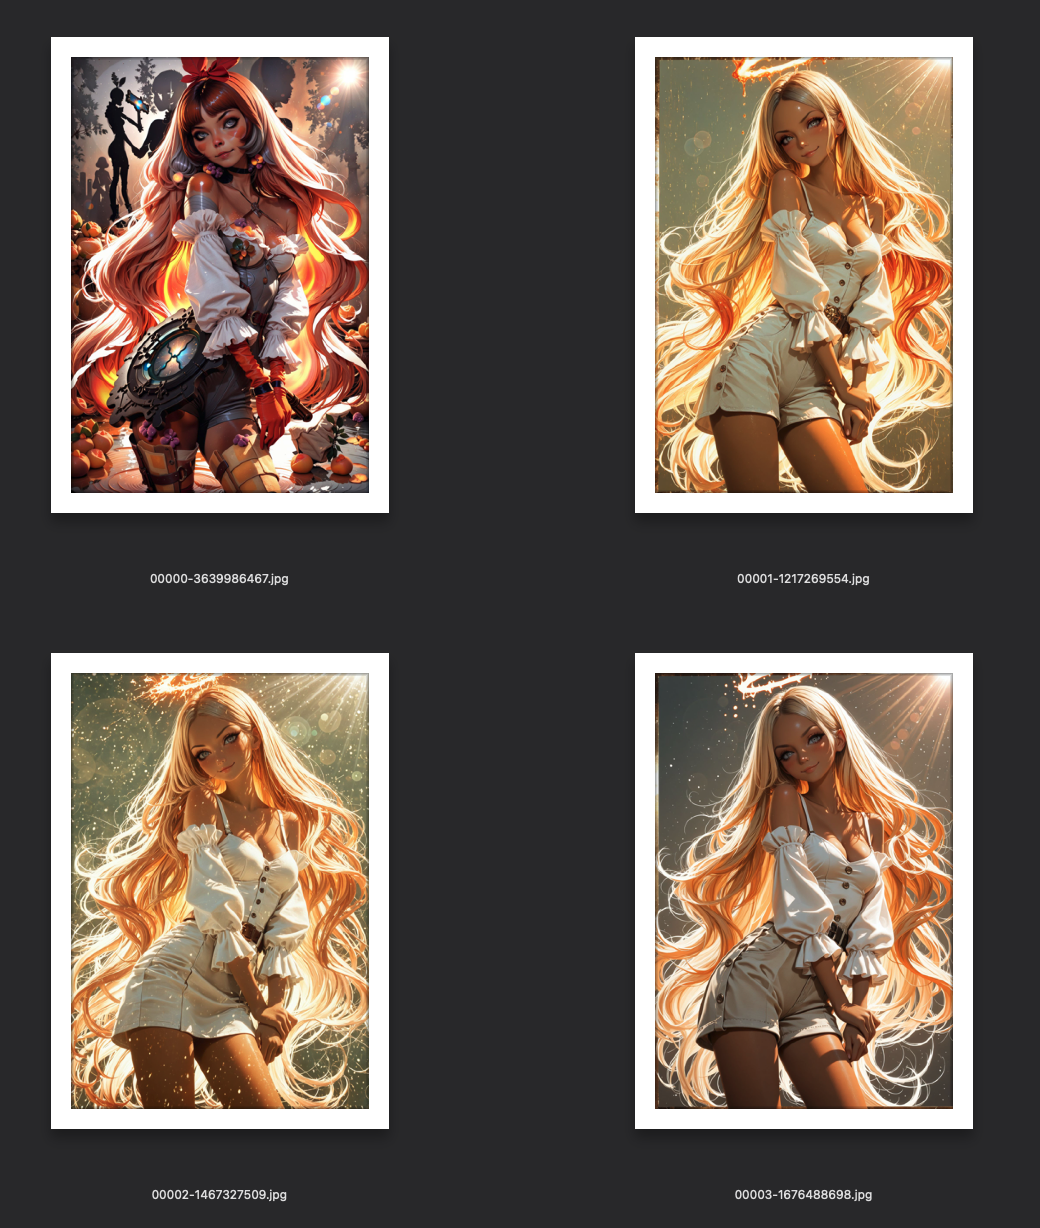
Here's what the high-res img2img passes produced from that same cropped reference — four different checkpoints, each interpreting the enhanced prompt differently:
And here's the full journey — the original cropped reference on the left, the final winner on the right:
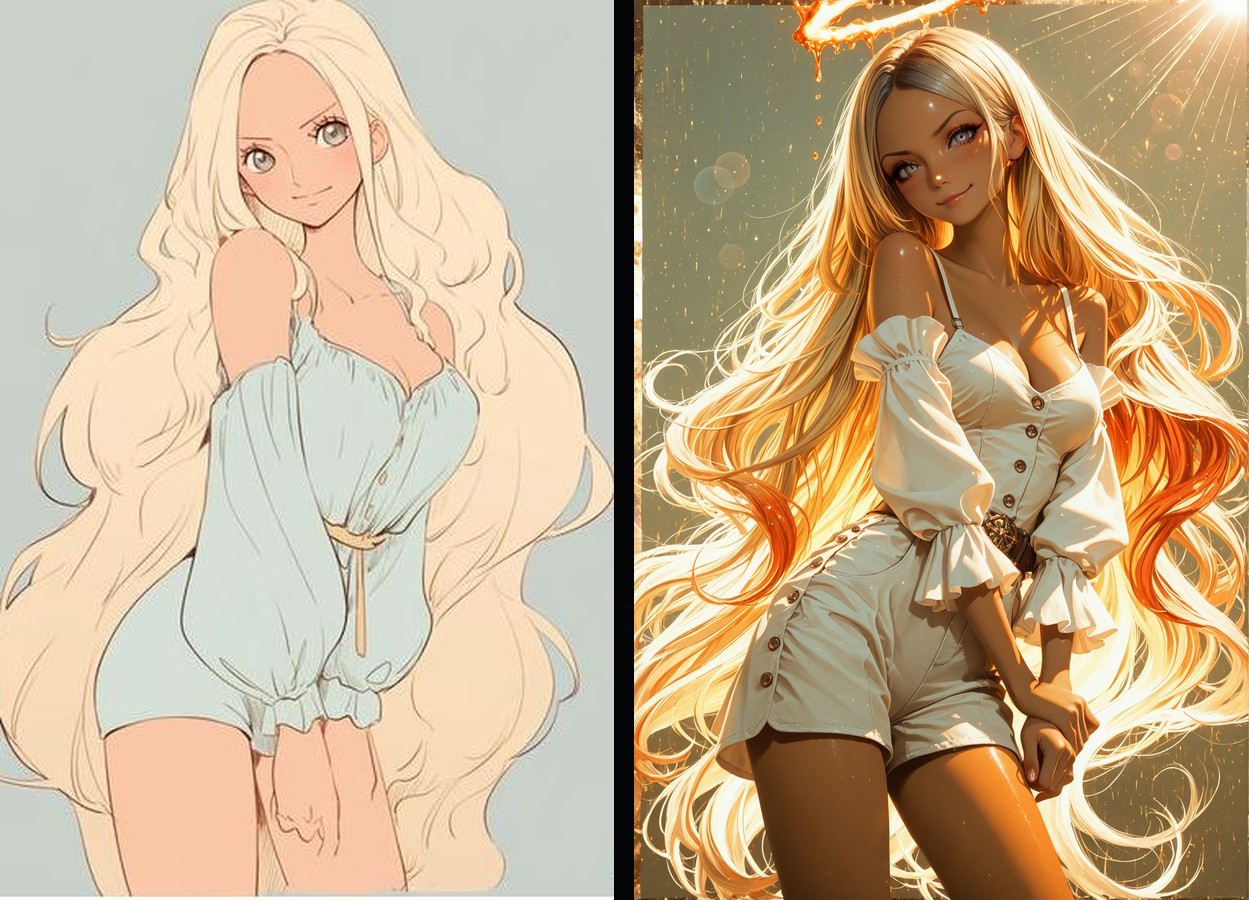
That's the entire process for one image: crop → tag → enhance → generate → pick → img2img finish. The reference gave the AI a starting point. The pipeline turned it into something new.
Starting from Extracted Tags
Sometimes I don't want the image itself — I want its DNA.
This approach is similar to the reference image approach, but I skip the img2img entirely. I extract the tags and use them purely as a txt2img prompt.
Why Not Just Use the Image Directly?
Because img2img gives you something that looks like the original. Tag extraction gives you something that feels like the original but looks completely different.
The AI isn't seeing the image. It's seeing words like "standing pose, white dress, dramatic lighting, wind-blown hair, sunset background." Those same words can produce a thousand different images. The DNA is the same. The expression is unique every time.
My Process
Same as before — crop, then tag. But instead of feeding the image into img2img, I take the tags and drop them into txt2img. From there I usually generate a batch of variations and cherry-pick the best compositions.
I use this approach most often when I like the concept of a reference image but not the execution. Maybe the composition is great but the style is wrong. Or the pose is perfect but I want a completely different character. Tags let me keep what works and rebuild the rest.
Starting from a Prompt
This is what most people think I do all day. And sometimes I do — but it's actually the least common starting point for my best work.
Pure Imagination
Sometimes an idea just hits and I want to build it from scratch. No reference. Just a concept in my head, translated into tags and descriptions.
Borrowed Prompts
Other times I'll grab the positive prompt and tags from someone else's image — on Civitai, or anywhere the generation data is available. But I always modify them. I'm not trying to recreate their image. I'm using their tags as a launching pad.
Maybe they nailed a lighting description I hadn't thought of. Maybe they used a tag combination that's interesting. I'll take that, strip out what I don't want, add my own direction, and run it through my pipeline.
The key difference between how I use someone else's prompt and how most people use it: they paste and generate. I disassemble, modify, and rebuild.
When I Choose This Path
Honestly? When I'm feeling creative and want to experiment. Or when I see someone else's work and think "I wonder what would happen if I took that concept in a different direction."
This is the most unpredictable starting point. Sometimes it produces my best work. Sometimes it goes nowhere. That's the trade-off of starting without a visual anchor.
How I Decide Which Door to Walk Through
There's no formula. But here's the general logic:
Realistic photo reference? Start from the reference image. Go heavy on the tags. I want to capture all the detail — the fabric textures, the specific lighting, the subtle color grading. Real photos have information that tags alone can't fully represent, so img2img helps carry that visual information through.
Anime or illustration reference? Could go either way. If I like the composition and pose, I'll use the image directly. If I just like the concept or vibe, I'll extract tags and go txt2img. Anime images have less fine detail to extract, so the tags are usually enough.
Painting or artistic reference? Almost always tag extraction → txt2img. Paintings have a style that img2img tends to flatten. Better to extract the concept and let the AI rebuild it in a different style.
Just feeling creative? Prompt from scratch. Or grab something interesting from Civitai and remix it.
Want maximum variety? Tag extraction with a loose tagger → batch txt2img. This produces the widest range of results from a single starting point.
Want a specific result? Reference image → detailed tagger → img2img. This is the most controlled path.
What Comes After the Start
No matter which door you walk through, you end up in the same place: the middle of the pipeline. That's where batch generation, recipe systems, cherry-picking, and refinement happen.
The starting point determines the raw material. The middle determines what you build with it. And the finish — the img2img passes — is what polishes it into a final piece.
The middle and the finish are where the real depth is. I'll be breaking those down in upcoming tutorials for Prompt Insider and Full Workshop members.
Try It Yourself
Pick one approach and try it this week:
If you've never used img2img: Find an image you love, crop it to your target aspect ratio, and run it through img2img with a simple prompt. See how different the result is from txt2img alone.
If you've never used tag extraction: Find a tagger tool (there are free ones built into A1111 extensions), run it on an image you like, and use the output as a txt2img prompt. You'll be surprised.
If you always write prompts from scratch: Go grab a prompt from an image you admire on Civitai. Don't use it as-is. Take it apart, understand what each piece does, modify it, and make it yours.
Start Here Track Complete
You're ready.
You've got the basics. Here are good places to go next:
Related Tutorials
Two Hard Rules For Blind Evals: 5-Prompt Floor And Always-Control
You ran a blind eval, picked a winner, almost shipped it — then a verification round flipped the result entirely. The candidate that won two of three prompts placed fourth across five. Three prompts felt like enough data; it was actually noise dressed up as signal. There are two specific design rules that prevent this failure: a hard floor on prompt count, and always including the previous version as a control. Cheap to apply, painful to ignore. Here's what each one buys you and the exact thresholds I use now.
Weighted Scoring — When Your 3/2/1 Tournament Hides The Real Winner
Your blind eval came back with two models tied at the top. 21 points each across 10 prompts under standard 3 / 2 / 1 top-3 ranking. Looks like a coin flip. It probably isn't. The standard scoring scheme treats 'never bombs' and 'wins more often' as equivalent — but for production model selection, those are very different qualities. Here's how to re-score the same data under different weighting schemes to surface the real preference, why ties under standard scoring often resolve cleanly when you reweight, and how to pick a scoring scheme that matches what you'll actually do with the result.
Multi-Round Merge Tournaments: Wide → Narrow → Dial-In
You ran a tournament with five candidate merges. Picked a winner. Shipped it. Two months later you wonder if the loser at slot 3 might have actually been better with slightly different weights — and you have no way to know without redoing everything. The fix is a multi-round tournament structure: wide net first, narrow on the winner's neighborhood, dial in along a single axis. Three rounds, ten or so total candidates, an answer you can defend. Here's how to design each round so the result is interpretable, not just a winner.